|

|

Presents:
Circular Logic
De-Mystifying Main & Rod Bearings |
|
Engine Reliability is #1 !!
An engine failure = zero HP
Many race tuners make the mistake of sacrificing reliability for more power. The reasoning is that since
race engines get rebuilt a lot, a sacrifice of some long term reliability is a
fair trade off for increased horsepower. This is a natural conclusion.
My philosophy about race engines is completely different. My number one
priority has always been that rock solid reliability comes first,
while increased power always comes second. Another way
of saying this is: anything that will cause a reliability problem or power loss
at a later time, is also a reliability problem or power loss right now. It's
only a matter of degrees.
My goal as an race engine tuner was to help my customers (who didn't have nearly
the same financial re$ource$
as the factory teams) win an unusually high percentage of races and
especially championships, without any rebuilds. In order to do that, the engines
still had to be fast for the last race of the
championship !!
When my customers won races and championships, an amazing thing happened
-- they started to attract sponsors, and their financial resources greatly
improved !! But, we still stuck to the original plan, and kept "reliability
without rebuilds" as our first priority.
While it's true that factory race teams rebuild their engines after every
race, during my career as an engine builder, many of my customers noticed that
1/2 way through the season after their engine was originally built, they could
still easily pass factory
riders on the straightaway. This has
happened many times with many different riders and many different brands
of motorcycles, and there are reasons for it ...
What I did was to study ways
to improve reliability over what's considered to be normal engine wear in
production vehicles. The result of this research is a great benefit to
street riders and car drivers who want better than normal reliability and vehicle
longevity.
In order to determine how to minimize engine wear, it's important to first study the
true causes of it. In racing, this understanding can make
the difference between a race win or a zero horsepower failure parked by
the side of the track.
On the street, it can mean the
difference between 100,000 miles / 160,000 km of high maintenance or 200,000
miles+ / 320,000 km+ of trouble
free use in a car.
(Note: Motorcycle engines usually wear out much sooner, mostly due to an
easily avoidable problem which will be explained on this page.) |
|
|
In this article I'm going to show you something in an engine which is so
fragile, that it can be easily destroyed by the friction from a wimpy
piece of paper towel.
Most likely, that will now seem unbelievable,
which is in keeping with almost everything else on
Power News...
|

Paper Towel !!
|
|
Note: this issue contains a lot of photos and graphics. Many of the smaller photos are
"clickable" so that you can view the full sized version. The
problems with this is that if your browser is maxxed out on graphic
memory, then all of the graphics on this page have to re-load again when you use your back
button to return to it. If you know how to clear out your temporary
internet files, that's one solution, otherwise, it's even easier to just
do this:
Click on the photo with the right mouse button. When
the gray menu box comes up, select "Open in New Window". When you
want to return to this page after viewing the photo, just close the large
photo's browser window. (This works with most popular browsers ... but
there probably are exceptions.)
|
|
.
.
|
This Website is The Most Informative Tech Site On The Web
Hi MotoMan.
It's not fair to tease us with a list of upcoming articles that look so
interesting. I want to read them now. This is the most interesting and informative tech site
on the web.
Keep up the good work.
~Damian
(Australia)
Hi Damian !!
This
issue is about one of the most widely misunderstood topics in engineering, so it
was harder to write than some of the past ones -- plus it required many
diagrams, animations and photos to visually illustrate the concepts.
Thanks for your support, I think you'll find that it was worth the wait
!!
Sincerely,
~MotoMan
The Ratio of 719 to 1
Hi MotoMan,
Interesting (Break-In Secrets) article.
I bought a new W650 parallel twin Kawasaki three years ago. I had read of an
Australian race car tuner who developed a running -in strategy similar to yours.
His was to start the brand new motor, warm it enough to be safe, get it into
third (or some gear where the load was high but the speed not silly) and then
nail it to the red line and allow it to come down to idle before repeating ten
more times, making a total of eleven. Taking my heart into my mouth, I did this
with my brand new twin.
About 1000 miles later, I ran it on a dyno, and it posted 51
bhp...not too bad for a street, long stroke 670cc parallel twin. I belong to an
enthusiasts group and typical horse power levels for motors run in by the
manufacturers methods run from 41
to 44 bhp
...
Says it all really...
I have one of the most powerful machines out of all the
720
members!
I'm glad someone else is prepared
to put it on the line!
~ Jon
UK
Hi Jon !!
Yes, that's a huge difference !! The key is to warm the new engine up, then run it hard.
Many people have thought that since the vehicles are ran this way at the
factory, they are already broken-in. As you've found out that's not true, since
each of the other
719 bikes were also run hard at the factory. That only starts
the process, and as you now know, it's up to the consumer to achieve the ideal ring seal.
Before you tested the hard break-in concept, it would have been reasonable to
say that 41 - 44 Hp is the standard of "full power" for the Kawasaki
W650. From this limited perspective, everyone would be happy.
But, since your engine is delivering its true potential, your bike has become the actual
standard of what "full power" really is. The new
(big picture) perspective now becomes:
719 engines haven't developed full power. That's a big paradigm shift.
That paradigm shift is the reason so many people are now discovering Power News.
Congratulations, and thanks very much for your support !!
Sincerely,
~MotoMan
P.S. To the Australian race car tuner: My "hat's off" to you !! 
She's Learning Fast ...
Hi Motoman,
I am a 21 year old female who has never had any interest in
motorcycles. In fact, I even hate driving cars and do so about once a year (or
less). However, I decided to buy a motorcycle and to hell with my
narrow-mindedness. I’ve been reading motorcycle-related material on the web
all day, but I am totally lost. I know nothing, and I mean NOTHING about
motorcycles. They all look the same, I have no idea how they work (or any engine
for that matter), and it is a wonder how anyone actually manages to drive them.
All the abbreviations and codes are a complete mystery to me. Also,
some sites contradict each other – adding to my confusion.
I read all of your newsletters
because—well--they're fun to read, and after a while I found that I understand
about 35% of the technical stuff. This is very encouraging. I
understand, of course, that yours is the wrong site for a beginner to learn the
basics, but I was hoping you could help me.
I'm not stupid, just not-so-mechanically-inclined, and I could use all the help
I can get.
Self consciously yours,
~Ilana
Hi Ilana !!
Thanks for your comments, it's very encouraging for me to read them !!
Even if you never plan on working on cars or bikes, understanding how they
really work will save you a lot of money, whether you're buying a new or used
vehicle. You'll also gain valuable insight into how to dramatically increase your
engine's life ... without even getting out any wrenches !! That's why I think
that Power News
is the best place to learn the basics about engines.
As a bonus, it will help you avoid being ripped off at the mechanic's --
something that happens to a lot of men too, although we don't like to admit it. ;)
The only thing I would add is that if you get a new bike and you want to break
it in right, I'd suggest having an experienced rider do it ... running a
motorcycle hard is not my recommendation for a new rider !!
Sincerely,
~MotoMan
The Challenge:
After reading this issue, I will guarantee that Ilana will have a better understanding of
how engines wear than most experts, including many Factory Race Team tuners !!
|
|
Investigative Journalism of Journalism
Now we're going to examine how and why the perception of
"expert" status
in the media can so easily fool the general public ... as well as most
engineers, and
even professional tuners at the top (factory) level of competition !!
 |
The #1 (unwritten) rule of journalism:
Never Upset The
Advertisers
|
|
The #1 rule of science:
Always Consider Alternate
Explanations
Even if it means having to
rethink what
we already knew.
|
|
"They couldn't all be saying it if it wasn't correct."
We have a natural tendency to automatically trust the "official" media.
Another common perception is that when a particular bit of info is repeated in multiple
sources,
that fact alone proves that the info is true.
As many have noted, my conclusions about most tech topics haven't at all matched up with the information
written by other magazine tech writers. The difference is, Power News goes beyond
written ideas by comparing those ideas against
actual physical observation and testing.
This is just a basic principle of good science.
Because of the difference in conclusions, the info presented here has been
heavily debated
and often sharply criticized on hundreds of motorsports discussion forums
!!
I encourage readers to post the Power News articles on discussion forums and let
everybody
Rip 'em up & Tear 'em apart ...
... because whether this info is right or wrong, sooner or later some logic will begin to surface !!
Isn't that the way things should be ??
|
Thinking outside of the box is usually associated with creativity, and doing
things in a new and improved way. (Right side of the brain.)
But, the
left
(Logic) side of the brain can be seriously limited by in the box
thinking. Some can't see the possibility that there might be another,
even more logical explanation for things, and this limitation
can be easily
exploited.
Try this perceptual test:
|
Without measuring them,
can you see which of the 2 red
lines is physically longer ... the top one or the bottom one ?? |

|
|
Before you look at the answer below,
double check it one more time, (but don't measure them yet !!)
.
.
.
.
.
.
.
.
.
.
. |
|
Surprise !!
These are the same 2 red lines, all I did was to remove the distracting
elements that
symbolize depth of field.
Amazing isn't it ??
Without measuring them,
can you see if there is a difference in their
lengths ??
|

|
.
.
.
.
.
.
.
.
.
.
. |
|
It may have seemed impossible when you first looked at the original
picture,
but it's true ...
the bottom line was actually
longer the whole time !! |
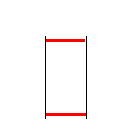
With the addition of the parallel
lines,
it's easy to see.
|
It Was Our Perception That Was Fooled, Not
Our Eyes !!
These things are called optical illusions, but they should really be called Perceptual
Illusions, because the problem isn't with our eyes. The symbols created
by the converging lines tricks our brain into taking a mental
short-cut, and we interpret the visual
information incorrectly.
Observation, in the form of actually measuring the difference confirms the
illusion. (Please don't take my word for it, measure the lines in the original picture for yourself ... this is
important !!)
Of course, we aren't stupid for being tricked by perceptual illusions, it's a
normal thing !! But, notice that once you became aware of the perceptual problem,
it became easier to see that the top line is at least not as long in the original picture, as it seemed the first
time you saw it.
When you become aware of a particular perceptual
problem, you're less likely to be tricked by it the next time.
Ironically, We Often Learn To Take Mental Short-Cuts
In School !!
In school, most of the information we read
is in textbooks, which are automatically assumed to be 100% correct. This
effectively trains us from an early age to read for one just thing ... the
memorization of facts. Once out of school, as long as information seems
prestigious, it never occurs to most people that it should be questioned or analyzed.
Thinking is much more than just memorizing and repeating facts, but
unfortunately, most formal educational systems measure and reward their students
only according
to their ability to memorize and repeat information. That's good, but
it's not actually thinking.
This substitute for thinking usually becomes a lifelong
habit -- a habit which invites perceptual problems !! Taking mental short-cuts
severely limits our ability for rational
thought.
What Does This All Have To Do With Engines ??
In this issue we're going to examine 2 articles which have been cited as intelligent and sane break-in
information, especially as they pertain to main and rod bearings. One was written by the most
well known tech writer in the US motorcycle magazine business, and both have quoted
famous factory team race tuners as their proof.
Expert status and prestige make it extremely
difficult to focus on the logic.
The problem is, these articles (and others like them in the auto world) have been
uncritically read and successfully memorized. The facts contained in them have
been in turn passed on to millions of
people. As far as I know, these facts have never been questioned in a widely
read publication.
Warning:
These articles have been endorsed by many with a high
level of education in science and mechanical engineering, and many highly trained professional
mechanics !!
Most experts agree that these articles contain solid,
scientifically sound information.
The Next Door Neighbor Critical Reading Technique
A quick read of these articles won't reveal any problems, but a careful read
will reveal lots. The amazing thing is, you don't even have to know that much
about engines to notice some of the problems, if you use my critical reading technique.
This technique is simple in concept, but it takes practice before
it becomes easy to do consistently. The trick is to remove two of the most powerful
perception
distorting symbols -- expert
status and prestige
! This makes it easier to consistently perceive reality using logic
outside of school ...
where it counts in the real world.
So, when you read these 2 articles, pretend that they weren't written by famous, well respected tech
writers and published in 2 well established, widely read magazines.
Instead, pretend they were written by
...
... your next door neighbor on a piece of scrap paper !
No Disrespect !!
This technique isn't meant to disrespect the magazines, the authors or the quoted tuners. The
idea of critical reading isn't to criticize people, it's to critically
examine the ideas. (I suggest using the next door neighbor reading technique with my writing,
as well as everything else
you
read !!)
My personal opinion is that Kevin Cameron writes the most interesting tech
articles, and I'm a big fan of his articles
dealing with the nostalgia and the old days of racing. But, that doesn't automatically
mean that all of his technical information is correct.
(Note: when you click on the links, these articles will open up in a new
window.)
Here's the first article. It was featured in the 1995 Sportbike Annual and it's
entitled
"It's New, It's Pristine, How Long Do You Have To
Baby It ?" :
http://www.dezmo.com/breakin.html
The second article is an excerpt which was featured in the Feb. 1991 issue of Motorcyclist
magazine and it's entitled "Give It A Break-In".
Important -- the longer excerpt, which is the one we'll be studying here, is the second
post down on this page:
http://www.kawiforums.com/forum/topic.asp?TOPIC_ID=1380
2 Important Notes:
1) I hope these articles stay on the internet for the future readers of this
page, but because of
possible copyright issues, the links to these articles may become unavailable. (Under
fair use copyright laws, it is only legal to quote parts of an article for evaluation
purposes, so I'm not going to be posting these entire articles on this site.)
This Power News article will concern the bearings only. In future issues, we
will be referring back to both of these break-in articles on the topics of ring
sealing and other aspects of their information. For this reason, I suggest either printing them out, or saving the text of these
2 articles as a document on your computer for future reference, in case the
links disappear.
2) Some people haven't noticed any difference between my break-in method and the
method described in these articles.
Although these articles recommend a slightly "harder" break-in than the owner's manuals do,
I'm saying that an immediate hard break-in is required for the
exceptional ring
sealing benefit, and as long
as the engine is warmed up first, this won't cause any damage; whereas they are recommending
first running gently for a while
before running moderately hard to avoid severe damage. The problem is
that this completely misses the exceptional ring sealing benefit, which is the whole point of my
break-in procedure.
The time frame and the damage warnings make these 2
articles the total opposite of Break-In Secrets.
This is why I will be referring to them as "easy break-in" articles,
so there's no confusion as to the difference.
Many people have tried to "mix" the 2 break-in ideas by first
doing an easy initial break-in, ("just to be safe") and then after a
while switching to my method. They've been disappointed when they found that
there wasn't a significant power gain, and many have decided that they might as well have followed
the owner's manual. If you understand what just happened, you'll realize that
what they really did, was exactly what is described in the easy break-in
articles !!
The method described in those articles will
produce nearly the same results as an owner's manual break-in.
Once the engine has some easy
initial mileage on it, it may help a little bit to run it hard. It's definitely
better late than
never, but it's not going to make the remarkable difference that so many people
are now discovering.
The reasons for this as well as my explanation for how rings seal will be
illustrated in future articles with diagrams and animations.
Today's article
will address the widespread misunderstanding about how bearings work, as well as
the "severe damage" question as it pertains to bearings during new engine break-in.
The Problem With Non-Critical Reading
...
This comment was posted on a popular motorsports forum by a degreed
mechanical
engineer in regards to plain bearings and why they require a long, gentle
break in:
"The new bearings are shedding their surface layers
as they become intimate with the journals."
If our "next door neighbor" had
written the above comment, someone would have challenged it. Because of this person's expert credentials,
the debate process just stopped cold.
For another variation of the "expert phenomenon." Here are 2
different comments on 2 different forums about Break-In Secrets VS
How Long Do You Have To Baby It :
#1: " I ran across an article on the subject
by Kevin Cameron. I like his articles because he always seems to know what he is
talking about, and because he provides meaningful technical explanations as
opposed to just leaving the reader to wonder why this and why that. "
#2: " I think Cameron (one of the most respected
motorcycle engineers) and Muzzy (one of the most respected motorcycle
builders/tuners) take top honors out of everything posted in this entire
thread. It's up to you who you want to believe but I'll continue listen to
the most educated ones. "
Here's a 3rd common variation of the "expert phenomenon", posted
about the Break-In Secrets article VS the owner's manual on yet another motorsports forum:
"Why haven't you read your owner's manual? Can't you read? Take it easy for at least 500 miles. The engineers who actually designed your bike
know best, everything else should be considered snake oil.*
* Note: "Snake Oil"
is a slang term usually associated with unscientific and unethical marketing.
At this point, a good question would be... do the engineers who actually
design the vehicles know things that they aren't telling us in the owner's
manuals ??
|
|
|
Do Ball
Bearings Require
Break In ??
|
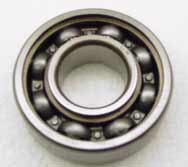
A ball bearing assembly
|
The Ball Bearing Manufacturers Polish Their
Balls.

Even in this low-resolution photo, you can
easily see the reflection of the camera lens.
.
|
Ball bearings are among the most closely dimensioned parts in the world of
manufacturing.
Ball roundness and size as well as surface finish
are held to a micro inch
specification.
1 micro inch = 1/1,000,000th ...
... one-millionth of an inch !!
The races that the balls run in are finished to this
level as well.
I'll admit, I can't think of any reason that
they should require break-in. |
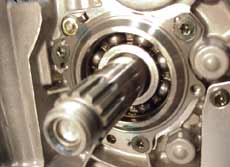
A typical ball bearing assembly
used on the transmission shaft.
The wheel bearings used in motorcycles are of the same basic design.
|
Turbochargers
This has particular significance for turbo cars.
The consequences of an easy break-in for a turbo vehicle can be
even more serious than in a naturally aspirated vehicle.
One of the justifications for an easy break-in with a turbo vehicle is that the
ball bearings in the turbo unit need to be gently broken in. Does anyone know a reason
as to why this should be true ?
I'd like to discuss this topic in a future issue.
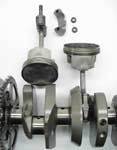
How Do Plain Bearings Work ??
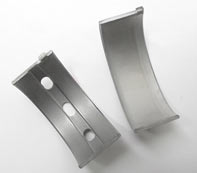
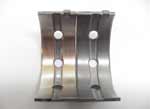
A main bearing (left) and rod bearing (right). They just
can't wait to get to work !!
Before I took apart my first engine, I imagined that the bearing itself was some
sort of anti-friction device. This incorrect idea came from the more familiar ball
bearing -- in which the rolling balls
themselves do function as an anti-friction device.
I had formed the wrong mental picture.
Instead, it helps to think of plain bearings as a sleeve or an insert.
How Do Plain Bearings Fit, And Stay
In Place ?
|
Rod Bearings:
The tab on the bearing insert fits into the notch in the rod. This locates
the bearing in the
center of its housing.

When the rod cap installed, the complete bearing is formed. In an actual engine assembly, these 2 halves are connected onto the crankshaft
journal.
(The word "journal" means the crankshaft's running surface for
the bearings.)
The main bearings are located in the crankcase with the same tab / notch
system.
|
Main Bearings:
The picture below may look intimidating if
you're not familiar with engines.
It makes it a lot easier to think of the 2 crankcase halves as in the same
way that the 2 halves of the rod assembly go together.
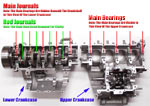
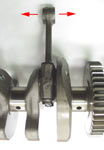
As you look at this picture, you'll see that there are really only 4
different parts to the main bearing arrangement: the crank, the bearings,
and the 2 cases which form the
main
bearings' housing.
(There are many other engine parts missing here -- this is to make it easier to see only
the main bearings and the crankshaft, and
how they fit together.)
Just like the rod bearings, the main bearing halves go together to form a
complete bearing shell which surrounds the crankshaft journals.
.
.
.
|
|
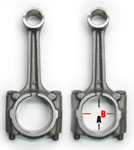
Here's how the rod connects to the crankshaft journal. The rod on the left is unassembled with the cap and nuts. The rod on the
right
is bolted in place.
Notice that those pistons had an excellent ring seal.
|
Bearing "Crush"
...
The outside
diameter of the 2 bearing shells are slightly larger than the housing they fit into. This creates an
interference or press fit, which is known as "bearing crush".
When the assembly is bolted together, the bearings are forced outward to give a positive contact with the connecting rod, or
in the case of main bearings, the crankcase block.
|
Note: this picture isn't visually accurate, it's more to illustrate
the conceptual idea. As you can see, before the bearings are installed, the bearing shells
are wider than they are
high. This is because the bearings also have a spring effect, which makes
them press into the
bearing housing.
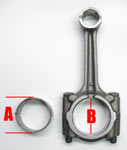
The point is that once the bearings are installed into their housing, the dimension "A" of the bearings is slightly larger than
the dimension "B" of the big end of the connecting rod.
(This is also true of the main bearings and the housing formed by the
crankcase.)
|
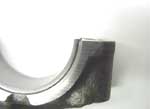
This picture of the rod's lower cap illustrates the crush concept. If you look closely, you can see that the end of the
bearing insert is sticking up above the rod cap slightly.
I purposely pushed it up a little more than it is in actual reality, to
make it easier to see in a photo.
The bearing "sticks up" like this in both the upper and lower
part of the rod, and when the parts are bolted together, the bearing
shells are "pressed" in what's known as an interference fit.
In the same way, the main bearings use crush to achieve a press fit within the crankcase
halves.
.
|
By using the tab/notch system and crush, the
bearings are
securely locked in place within their housings.
The Bearing Surface
The main and rod bearings work in a similar way. One exception is that the
main bearings have holes in them, and an oil channel machined down the middle. This is how
the oil gets into the plain bearing system which will be explained later on this
page.
In some engines, some of the main bearings don't have oiling
holes. The reasons for this are outside of the scope of this article, but
the short answer is that there's just a slightly different oiling path. Even in
those engines, the other main bearings have holes in the like the one
shown here, and that is how the oil is introduced into the system.
In the majority of late model motorcycle engines, all of the main bearings
have oiling holes, like the one pictured here.
.
|
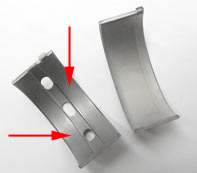
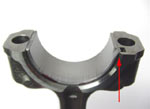
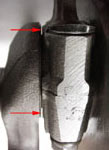
The running surface of the rod bearing is over the entire width of its surface, while
the main bearing's running surface is only on the 2 outer sections indicated
by
the arrows.
(The oil channel in the middle is below the running surface.)
|
How Does A Plain Bearing Reduce Friction ?
In use, the bearing
itself doesn't have any friction reducing characteristics.
Rather, the system uses the unique properties of liquid (oil) as the anti-friction "device":
|
In this animation, the oil clearances have been greatly increased to give a clear view of the oil film's dynamically changing
dimensions between the bearing and the crank journal.
(The average normal oil clearances for main and rod bearings are
around .002 inch / .05mm.)
The bearing itself doesn't "do" anything. The crank journal
surface floats above the bearing surface, on the oil film.
(This assumes proper oil pressure, bearing-to-crankshaft oil clearance
and correct bearing installation.) |
The crank journal is dark gray, oil is dark yellow,
and bearing is light gray.

As the engine rotates, the crank journal goes "off-center"
within the surrounding oil supply. Although it can move within the
dimensions of the volume of oil, the crank journal surface itself never contacts the bearing.
Both main and rod bearings work this way.
Bearings are fed pressurized oil. This pressure is critical, because
although the crank can push the oil aside, it's the pressure which keeps
the crank from breaking through the oil film
to contact the bearing.
.
|
|
At first appearance, this system seems like it shouldn't work.
It works only for one reason:
Oil, like all liquids, is non-compressible !*
.
|
* In theory, even solids
are compressible, as in Black Holes in outer space. These are forces which are
far beyond the ones we're dealing with in engines. Under laboratory conditions,
liquids are slightly compressible. The pressurized fluid loses only a micro
percentage of its volume
when it is squeezed with extraordinary pressures.
In real world applications, this has no measurable effect on hydraulic systems.
This is why, although from a strictly theoretical scientific viewpoint, liquids are
considered compressible --
in engineering applications, liquids are considered non-compressible.
The Power of Hydraulics 1
I had the opportunity to test
the power of hydraulics by digging gigantic rocks at the
Arctic Circle Raceway in Norway. I was amazed at how easy it was to learn to
operate this huge machine, and the ease with which I could toss around mega-ton boulders,
as if they were little pebbles.
Of course, the power to do this comes from an
engine, but the reason it's possible to lift such a heavy load, is that the power is transmitted through the hydraulic fluid
which in turn lifts the shovel.
The shovel would just collapse under the heavy load, were it
not for the non-compressible qualities of liquids.
Many big name race teams just put some
stickers on the race vehicle and consider that "promotion".
This is by far the most impressive sponsor promotion effort I've ever seen:
|

Check Out These Websites
To Learn More:
For Komatsu Sales In Norway
http://www.hesselberg.no
Arne Sandum
Sales Manager
For Komatsu Sales Worldwide
http://www.komatsu.com
(The 2 links above open in a new window.)
|

Team Komatsu-Yamaha Norway
By letting the race fans try out the
equipment,
2 Time Norwegian National Roadracing Champion Dag-Steinar Sundby
and his team have done an outstanding job of promoting their sponsor !!

MotoMan "Digs" Komatsu !!!
The thing that really impresses me about Komatsu is their commitment to
long term reliability.
Check Out Their
Automatic Grease Injection
If you're in the market for heavy equipment,
please consider the purchase of a Komatsu !!
.
|
The Power of Hydraulics 2
Hydraulic Lock -- this happens when an engine's cylinder is filled with
gasoline from a leaking carburetor float valve. When one attempts to start such
an engine, the non-compressible fluid stops the piston. If the battery is strong
enough, the connecting rod will transform from a useful engine part, into an
interesting "S" shaped sculpture worthy of an abstract art gallery !!
Liquid makes an incredibly strong bearing.
The Ingenious Design Concept
of Plain Bearings
Plain bearings are designed with the idea that, should failure occur,
the expensive crankshaft will be unharmed, with the damage limited to the
inexpensive bearing insert.
In actual practice, this is true to a point, but if the engine is allowed to continue
to run much after the bearing is damaged, the crank will soon be damaged as
well.
|
Embed-ability
The babbit layer is about as soft as lead, and it can be easily scratched by
harder metal.
This is by far the
softest metal in an engine.
The purpose of this soft metal layer is so that any metal fragments in the oil supply will embed into the soft bearing,
leaving the expensive crank unharmed.
The copper layer is harder, making it an ideal 2nd layer material. It's
hard enough to support the babbit layer, while it's soft enough to allow
it to "give" when a bit of metal is embedded in the babbit
layer.
The steel layer gives the bearing its strength and "spring" so it can be
installed with a slight interference or press fit into its housing.
Because of the embed-ability requirement, the bearings are fragile. If there is
crank journal to bearing contact while the engine is running, the soft
babbit layer is easily
damaged.
|
3 Metal Layers
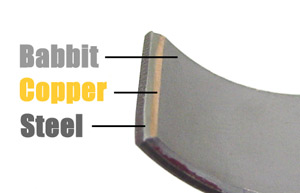
The copper layer looks thicker than it really is ... because I cut the
bearing at an angle to make it easier to see the layers in the photo.
Also note the magenta-red paint marking on the side edge. This is to indicate the
bearing's thickness. Bearings typically come in 4 or 5 sizes to accommodate
slight differences in crankshaft journal diameter.
Note: The size differences
for motorcycle engines are extremely small, approximately .00016 inch /
.004 mm for each size increment. Some car bearings have a much larger
range of sizes. This difference has caused much confusion in the
motorcycle world, and this subject will be covered in the next issue.
.
|
It Really Works ...
|
This bearing surface has very effectively "absorbed" some metal
bits.
As you can see, there wasn't any scoring around the bearing. If the metal
surface of the bearing were hard, any debris in the system
would ultimately score the expensive crank.
The only drawback to this design concept is that as more and more bits are
embedded, the bearing surface immediately surrounding the embedded bit
raises, and tightens up.
Eventually, if there is enough loose metal or grit embedded into the bearing
surface, the overall clearance can get tight
enough to cause metal to metal contact with the crank journal,
resulting in bearing failure.
.
|
Embedded Metal Bits In
A Main Bearing.
|
|
Main
Bearings
The main bearings' oil comes from the crankcase, and enters into the bearing shells, through the 3 pressurized oil
delivery holes in each bearing. (In the diagram, the 3 holes at the top are
marked, but there are also 3 more holes in the lower bearing shell.)
Like the earlier animation, notice that as the crank rotates, the journal is "off center" within the oil clearance. The
forces on the crankshaft cause the journal to displace oil within
the "container" formed between the journal and the bearing, but it can't
physically compress the pressurized oil.
(Again, the oil clearance dimensions have been increased for illustration
purposes.)
After the oil flows between the bearings and the journal, the next route
of its path is into the hole represented in the center of the crank
journal. This hole leads the oil to its next destination ...
|
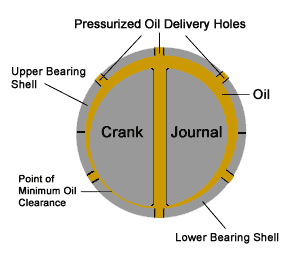
Note: As mentioned earlier, in some engines just one main bearing in the pair has oil delivery
holes.
.
|
The Oil Path Within The Crank
|
.
The oil flows from
the main journals marked "A", to
the rod journals marked "B",
through the passages drilled within the crank,
(denoted with a red line).
The
direction of oil flow is indicated by the green
arrows.
This is a clever system, because it isn't practical to have the rod bearings'
oil supplied from a static source the way the mains are, since the rods are
moving over a large area.
Another interesting thing about this is how the passages are created. The crank
can't originally be made with internal connecting holes, so they have to be drilled from the
outside. The outside of these holes then have to be plugged, to form a
closed system. The hole is plugged with a ball, and then the metal around
it is peened over to keep the ball in place. The balls are marked "C".
(As you can see in the photo, the inspectors at the factory double check
and then paint the ball
areas to signify that they've been securely peened over. A loose
ball
would be a disaster !!)
.
|
Oil Passages Within
The Crankshaft:

With the connecting rods removed, it's easier to see how the oil
flows.
The oil enters the crank through the main journal holes "A",
then exits the crank from the rod journal holes "B".
Because of the direction of oil flow, if there is any debris inside
the crankshaft oil passages, the main bearings aren't affected, but the rod bearings
will be damaged.
|
Because they get their
oil supply after the main bearings, this is one reason rod bearings are the weakest link in
this system. If there's a loss of oil
pressure, the end of the system is affected first, so
the rod bearings are the first to suffer from oil starvation.
A second reason is that the force of the power stroke bears down on just 1 rod bearing, while the
same force is always shared by at least 2 main bearings. In a 4 cylinder
engine the load is spread over 5 or 6 main bearings (depending on whether
it's a center cam chain tensioner or end cam chain tensioner design.) This
stress on the rod bearing, combined with being the last to receive oil,
are 2 problems that the main bearings don't have.
Rod Bearings
Whereas the oil supplying the main bearings went
from the cases into the main bearing / journal interface and into the
crankshaft -- the rod bearings' oil supply direction is just the opposite.
It comes from inside the crank and is forced outward between the rod bearing
and journal.
The oil delivery is in reverse, but the action of the journal "trying" to squeeze out the excess oil, and meeting an
uncompressible pressurized oil film is the same as it is with the main bearings. As you can see,
there are no holes in the rod bearings, since the oil is fed from within
the crank.
The occasional exception to this is some engines which have a very small oil hole going through the bearing and the upper rod where the beam
meets the upper bearing housing of the rod. The purpose is to spray a jet of oil up to lubricate the cylinder
walls, pistons and rings.
.. |
|
Where Does The Oil Go Next ?
|
If you've never dug into an engine this "deep", you
may be surprised to find that the connecting rod can be
moved from side to side quite a lot !! |
At first it seems so wrong !!
.
|
|
It does seem "wrong" but, this rod side clearance is required, because
it's the only "escape route" for the oil
on most engines.
It's also the way the piston and rings are lubricated.
The pressurized oil leaves the rod bearing - crank journal interface through
this clearance, and the oil sprays up to lubricate the piston, rings and cylinders.
The oil then drains down to return to the sump at the bottom of the engine,
to
start the cycle over again.
Note: as mentioned above some engines use an oil hole, but these designs also have
some rod side clearance. |
Here, I've pushed the rod to one side so it's easy to see the clearance
between the rod and crank cheek.
On most motorcycles, this clearance is .004-.006 inch / .1mm-.15mm.
Larger motorcycles and car engines often have a bit more rod side
clearance, but the principle
is the same.
.
|
" Break-In Secrets
Part 5 "
Do Plain Bearings Require Break-In ??
What is Logic ??
You've probably heard people say "that doesn't seem logical",
which is a misuse of what logic actually is. Logic isn't a feeling; and a statement all by
itself is neither logical or illogical (although it can
be true or false). True logic is the process of drawing a conclusion from
premises, and it is set up kind of like
a math equation. Unless all of the premises are correct, the conclusion will be
flawed.
What is Circular Logic ??
Here's a common example:
Premise 1: Most mainstream motorsports magazines warn that you shouldn't run new
engines hard right away, because that will cause
serious damage.
Premise 2: Power News says exactly 100% the opposite of that.
Conclusion: Therefore, Power News is snake oil.
The problem with this argument is that it contains an assumed premise, which is,
that these magazines know the
full story and contain accurate technical information.
In order for the conclusion of a logical argument to be accurate,
the premises must be
proven to be true first.
One premise is absolutely true, and that's #2
!!
Let's examine premise #1...
|
|
1/2 The Story
What if a newspaper reported that a man jumped from the 100th floor of an apartment building,
and miraculously escaped the ordeal with only a sprained ankle ??
But, what if the newspaper reporter didn't know that the man only landed on the balcony,
3 feet below
the window he jumped out of ??
.
|
The other 1/2 of the story
drastically changes the meaning of the entire
story.
Quote from the
Give It A Break article:
"...
it's likely that a new bike was run at the factory ..."
This statement is very misleading, because it really downplays what
actually happens.
Power News readers are learning the other 1/2 of the story ...
the part which has been kept well hidden for over 20 years:
|
This is like the famous scene
in the Wizard of Oz when Dorothy got to see how it all works ... except
this is real: |
|

Those Disturbing
Pixels of
Debunkification
|
The bikes aren't just
"likely" to be run at the factory, in fact ...
The factory technicians
give all new bikes a
Full Throttle Max RPM Blast
through the gears !!
|
|

|
The magazine tech
writers and the factory race team bosses and mechanics quoted in these articles don't know about
this aspect of the manufacturing
process !!! |
|
It might seem unfair to say this, since these break-in
articles appeared back in 1991 & 1995. But
a close look at the new bike in the photo above
confirms that it's an early
'80's model !! I'm not exactly sure when the factories started doing this, but it's safe to say that this reality predates these 2 articles by a
very long time (at least 8 to 12 years respectively.)
My estimate is that some factories were doing this as
long ago as the mid 1970's ... can anyone confirm ??
When we examine the information purely from the basis of mechanical logic, while keeping in mind
the info that the writers of the numerous easy break-in
articles don't know about ...
... it becomes possible to understand the real logic (reasons) behind the modern easy
break-in concept.
There are many levels of logic. Once one level is seen and acknowledged,
only then is it possible to examine logic on
the next level higher.
(Seeing the bigger picture.)
5 More Reader Reports:
New Nissan Cars Fully Blasted:
A number of years ago I was in Japan working for Nissan Canada
and we were invited to visit an assembly plant. You should see the final road
test they submit the cars to on a dyno. The driver floors the
accelerator and takes vital statistics from dials for about 3
minutes. If they pass this test they are OK. The
Japanese must be laughing when they read the lines about engine break in.
All of the motor vehicle industry
insiders have been laughing at this situation ... for a long time.
New
Ford Cars Fully Blasted:
I once took a tour of the Ford plant. The engines
are all dyno tested and screamed to top RPMs at full throttle. That's
when I knew the easy break-in engine damage warnings weren't true. The funny thing is that they
checked my bag for cameras or video recorders -- that's not allowed !!
Why all the concern about video & camera
equipment ?? If there's nothing to hide, why is there an effort to hide
it ??
New
Honda Motorcycles Fully Blasted:
At Honda at Marysville Ohio the new bikes are strapped to a dyno wheel and run
to red line
and at over 100 mph before it is crated up and shipped.
Didn't they read those easy break-in articles ?? After all, they helped pay for
them.
Diesel Blastage @ Ford:
I can only speak for 1.8 Diesel for Ford as that's
what I'm assembly engineer for, but once the engine is built its conveyered into
a cell and then started. After idling for 30 secs (with a lot of auto checks on
oil pressure, coolant temp etc etc) it's then taken up in 500rpm increments
every 10 secs until the grand finale of 10 secs at max no load speed. I
still cringed this afternoon when I walked past them screaming (as much
as a diesel can) away. Of course, every so often
half way through this a con rod will emerge from the side of the block but this
is what the test is for, to show up any manufacturing defects.
Screaming Diesels !!
New
Aprilia Motorcycles Fully Blasted:
Every bike that leaves the Aprilia factory (and
every other OEM factory)
goes through each gear to the {rev} limiter, no bull, its
part of quality control.
Bikes used to come in without the high speed indicator
reset,
quite often the bikes would have 175mph on the dash. I saw a
Factory
{model type} with 182mph on
it, and I know I sure didn't do it.
{Note: the 2 bracketed comments are my additions ~MotoMan}
I wonder how the guy whose job it is to full throttle redline new Aprilias all
day breaks-in his family car ??
Does he follow the owner's manual and drive real nice and easy for 600-1,000 miles,
to avoid severe engine damage ??
|

MotoMan
|
"Gee Whiz ... you can't really violate the
logic of the easy
break-in articles any more
outrageously
than that."
|
|
.
.
.
.
.
.
.
|
When you think about it ...
The first running at the factory really
is the
hardest
running
most engines will ever receive.
Except for the small percentage of cars and bikes that are used for racing,
the
vast majority of vehicles on the road will never get the
sustained
full throttle,
maximum RPM use that they experience in their
very first time running.
Let that idea soak in for a little while ... it's a real brain twister !
The Denial Mechanism Known As:
CD
Some in the motorsports press, have literally "scared
people out of their minds" that engine damage occurs from running a brand new vehicle
hard. Seeing all
of this information now may cause the readers
of those magazines to experience an extreme perceptual illusion.
No one likes to think that they've
been fooled.
Like an optical illusion, even the most rational, highly educated
and otherwise intelligent people
will be able to see the words and pictures, yet still have their perception distorted by
CD.
CD = Cognitive Dissonance. This effect completely blocks
disturbing new information from entering the
consciousness.
Just as if it never existed.
Some will immediately get over it and
see the easy break-in deception for what it is. But, there's no question that others will come up with a powerful rationalization in order to keep on believing the
myth.
Whatever the rationale is, it would have to also ignore the concept of cause and effect,
so it won't be a scientifically sound reason.
Here's one possibility:
|
.
At the factories, there are
magical Dweeb-a-zoids
who send a re-integrating micro-particle beam, which fully protects the engines
from damage, while they get pinned to the max and blasted into the
stratospheric part of their rev band !!
Alas, the Magical Dweeb-a-zoids
vanish the moment
the vehicle leaves the factory.
.
|

Those Rarely Seen
Factory Dweeb-a-zoids
|
|
.
But ...
Once you take ownership of the
vehicle, the "still scientifically valid reasons" contained in the easy
break-in articles will instantaneously go back into retro-effect !!
You see .... that's because for the next 600 - 1,000 miles,
your new engine will be haunted by ...
The Evil Hobgoblins !!
.
|
The Evil Hobgoblins

|
Newly Revised Easy Break-In
Warning:
Heavy throttle and high revs in the absence of the magical Dweeb-a-zoids
will cause serious engine
damage.
The Evil Hobgoblins
will make sure of that. ;)
|
To be fully convinced,
people have to really believe in an idea, not just mentally, but in
their heart.
The statement below is effective because it evokes the most powerful emotion
of non-thinking, which is of course:
fear. |
|
A Frozen Moment of Crystalline Clarity
|
Quote from the
How Long Do You Have To Baby It article:
"
If the break-in begins at high RPM and heavy throttle, the process may generate
more heat and metal debris than the system can handle. Then the result is
destruction
of contact surfaces in some parts of the engine. "
(Hey wait a minute ... that precisely describes what the factories
have been doing for over 20 years !!)
(Hey wait another minute ... that precisely describes what
is
recommended in the Break-In Secrets article also !!)
. |
It's Crystal Clear
that the manufacturers actions show that they don't agree with
the
destruction
statement.
Of course they agree publicly,
in an "official" sort of way ... but Power News isn't about fake "official" stuff.
Many people have asked me: "Why didn't you just reveal what goes on at the
manufacturers
in the Break-In Secrets
article, since it would have made it much easier to believe ??"
Because this isn't about believing things,
it's about understanding things.
This page is all about a higher level of thinking ... so in a way, revealing what happens at
the factories
is taking a mental short-cut. Just knowing what they do, doesn't give us an
understanding as
to why blasting a new engine doesn't cause any damage whatsoever.
If we fully understand
how bearings work, then we will come to the same conclusions that
the factory engineers did regarding bearings and break-in, without even knowing
the
other 1/2 of the story or having to personally visit
a factory !!
In other words:
Is it possible to just "think out" the bearing part of the break-in secret
without the luxury of knowing this hidden information ??
Yes !!
I figured out that the manufacturers blast the new vehicles
12 years before I heard about it from eyewitnesses or had photographic
evidence of it. This is what science is all about -- thinking things out using
logic and observation, without having to
be told by someone
who's widely perceived
as an expert.
It's not about me being the
perceived expert ... it's about you being a real expert !!
Quote from the
How Long Do You Have To Baby It article:
" ...
bearings spin
without metal-to-metal contact, on full oil films
"
(Note: in the article's context, this means
"after the break-in process is complete."
)
Oil, like all liquids, is non-compressible !
This quote brings up 3 questions:
1) Do
the bearings spin with metal-to-metal contact in a running engine ??
2) Do they spin on anything less than full oil films in a running engine
???
3) Come to think about it
.... do main & rod bearings even spin
????
Not to be confused with the
term "spun
bearing" which means a ruined bearing.
Do the main bearings
spin (rotate 360 degrees continuously) ??
No, the main bearings don't
spin ... they don't move at all !!
|
.
The main bearings are in a fixed
position in the crankcase, the main bearings don't rotate.
Although it's not possible to see the lower main bearing shell in these
pictures, I've painted the area they are fixed to green,
to make their non-moving status more apparent.
(In a running engine, the upper case would be in place, which forms the
other half of the complete bearing surrounding the crankshaft.)
.
|
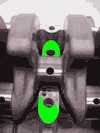
The main bearings simply support the crankshaft as it spins continuously within the bearings, but
the bearings themselves don't move.
|
Do the rod bearings
spin (rotate 360 degrees continuously) ??
No, not all all. In fact a close examination reveals that for nearly 50% of the time,
rod bearings rotate ...
... backwards !!
.
.
.
.
.
..
.
.
.
.
.
|
.
Backwards
??
Here the rod
bearings are green
-- notice that they only rotate about
15 degrees, or 1/24th of a turn, pause and then rotate about 1/24th of a
turn
backwards in the opposite direction !!
The process is repeated for a total of 4 back and forth
movements
per each full revolution of the crankshaft.
Remember that since the bearings are in a fixed
position, they move along with the rod. If it's hard to see
that the bearing rotates backwards, try
concentrating only on the change
in the angle of the connecting rod as you
watch the green bearings.
The crankshaft's rod journal is colored red.
This makes it easier to see
that the crankshaft
and its journal are all one solid part which rotates
continuously in one
direction within
the rod bearings.
.
|

|
Practice making more complex visual mental images !!
The next (much more challenging) step is to visualize what an actual
engine looks like as the rod rotates backwards. Make the picture in your
mind complete with metal, oil, and especially the movement of the parts.
Eventually you'll find that it becomes much easier to make mental pictures
even to the point of simultaneously visualizing the incredibly large
number of complex events happening in a running engine !!
People who are capable of doing this have an immense advantage, but it
takes practice.
This is the secret to your becoming an exceptional
engineer / mechanic !!
Why Is It
Important To Understand The Concept Of
The Rod Bearings' Backward Motion ??
Because we can now examine one of
the
least understood reasons
why the rod bearings
are more failure prone than the main bearings are.
This is a more challenging concept to understand, because you've really got to
study
the still pictures and make a mental image of 2 moving things at once
(Right
side of the brain)
while at
the same time you have to think about what's logically happening
(Left side of the brain):
|
As the piston descends from the top to 1/2 its stroke, the crank is
rotating clockwise while the rod bearings are rotating counterclockwise.
The speed differential between the bearing and the journal is dramatically
increased !!
(To see which way the rod bearing rotates, it helps to focus on the
line
that represents the split between the upper half of the rod and its lower half.) |
Increased Surface Speed Differential
|
|
As the piston descends from 1/2 its stroke to the
bottom, the crank is rotating clockwise while the rod bearings are now
also rotating clockwise. The speed differential between the bearing and
the journal is now dramatically
decreased !! |

Decreased Surface Speed Differential
|
|
As the piston ascends from the bottom to 1/2 its
stroke, the crank is rotating clockwise while the rod bearings are also
rotating clockwise. The speed differential between the bearing and the
journal is the same as the frame above -- decreased !!
(Note: decreased in relation to the first frame.) |
Decreased Surface Speed Differential
|
|
As the piston ascends from 1/2 its stroke back to the
top, the crank is rotating clockwise while the rod bearings are now
rotating counterclockwise. The speed differential between the bearing and
the journal is again dramatically increased !! |
Increased Surface Speed Differential
|
|
.
So, while the main bearing to journal speed is constant at a
given RPM, the rod bearing to journal speed is actually much faster during 2 key
portions of the engine cycle at the same RPM !!
. |
Why Do Rod Bearings Usually Fail First ??
Now we have 3 reasons why rod bearings are more stressed than main bearings. If
a main bearing and a rod bearing had identical friction problems, the rod
bearing will fail sooner than the main bearing would.
To summarize:
1) Rod bearing frictional problems are magnified because of the higher speed differential
during the 2 "backwards acceleration" points shown above.
2) Oil delivery gets to the rod bearings last. If there's a loss of oil
pressure, or an obstruction in the oil delivery path from the main to the
rod bearings, the rod bearings are the first to suffer from oil starvation.
3) The force of the power stroke bears down on just 1 rod bearing, while the
same amount of force is always shared by at least 2 main bearings.
This Next Concept Really Rocks !!
The 2 times that the bearing's speed in relation to the journal
surface is increased, also happen
to be the 2 most stressful points in the 4 stroke cycle. These 2
points are the first
half of
the power down stroke, and the last half of the exhaust upstroke.
It's important to understand this, because it
makes reason #1 above even more serious.
The
forces involved in the power down stroke are obvious, but can you see why the last half of the
exhaust upstroke is such a highly stressful point in the 4 stroke engine cycle ??
Why ??
The last part of the exhaust stroke is stressful, because there is nothing to
"cushion"
the G- forces of the weight of the piston and rod !!
.
The common misconception is that the piston pushes out high pressure exhaust
gasses. Remember from the 8 Phase Motor article, that during the physical exhaust stroke
the piston doesn't push out high pressure
exhaust gasses !!
By the time
the piston is going up, most of the exhaust pressure has already been released. In fact in a
really well tuned engine, the exiting exhaust gasses create a low pressure
condition in the cylinder which actually pulls up the piston.
For
these reasons, the connecting rod experiences extremely high inertial loads at the
very top of the exhaust stroke. The weight of the piston and rod assembly is unopposed, and the G-
force
yanks up on the rod cap ... Hard !!
At high RPMs, this loading stretches the rod and pulls
the big end out of round causing it to squeeze inwards across the rod's
horizontal parting line. (Dimension "B" in the photo to the right.)
This stretching and return to normal shape happens on every 4th stroke of the
engine cycle during high RPM !!
It's incredible to think about --
At 15,000 RPMs, that's 125 times a second !!
If "wearing in" the bearings during running to make them fit properly were a realistic option, the
bearing's inner diameter could just be worn in to
the correct dimensions during "break-in".
When early auto racers first experimented with higher RPMs, the rod bores stretched which caused the previously untouched horizontal portions
of the bearings to wear.
You can imagine the result. As soon as the babbit metal wore, it spread across the bearing, heated up and
caused massive engine failures.
Many early tuners got scared of high RPMs, and with good reason.
.
|
The last half of the exhaust upstroke, from the picture on the left to
the one on the right is the number 1 stress point in
the 4 stroke engine cycle !!
|
|
In this photo, the image of the rod on the right has been modified in Photoshop to illustrate
the effect high RPM stretch has on the big end
bearing's bore.
When dimension "A" is increased, dimension
"B" becomes smaller.
( Note: the dimensions have been greatly increased to make it easier to
see this effect.)
|
The Solution:
Strange but true... "Oval Bearings" !!
Since metal to metal bearing contact in a running engine quickly leads to
failure, bearings are designed so that even at maximum
RPM,
there is never any metal to metal contact.
It was
found that a slightly oval bearing
inner diameter is required to compensate for the high RPM stretch of the bearing
housing ...
.
The bearing wall is thinner near the ends of the
bearing shell than it is in the center section. This section corresponds
with the horizontal split between the full circle formed by the 2 bearing
shells, providing extra clearance, so that when the rod bore pinches inwards,
there is no contact with the crankshaft journal during the high RPM
exhaust upstroke.
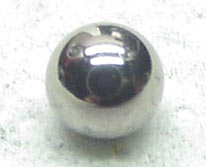
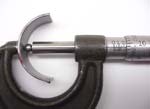
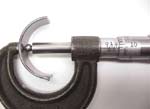
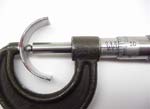
A ball is required to measure the thickness of a curved surface
like a plain bearing. While this won't give the absolute thickness of the
bearing, it shows the comparative difference between the 2 measurements.
(For the absolute thickness, just measure the ball and subtract the
difference.)
When using a micrometer, it's important not to get any heat from
your fingers into the micrometer, or the part being measured !! The heat
will expand the part or the micrometer which will make the measurements
inaccurate.
..
|
|

|
|
.
Different engines have different amounts of
"bearing ovality", which is matched to the engine's RPM and the
weight of its piston and rod assembly.
In the case of the Yamaha R6, the difference is quite a lot --
approximately .0017 inch. Since the clearance is on both sides, this
means that there is a total of .0034 extra horizontal oil clearance
to allow for a rod-ovalling 15,000 + RPM !!
If you have a micrometer, please don't take my
word for it. By all means, buy a rod bearing
for your favorite vehicle and measure this difference for yourself !!
Since the rod transmits the upward G- forces to the crankshaft, the main
bearings also have the same "oval" design. I'm suggesting
using a rod bearing for this experiment only because it's much
easier to get the ball in place for the measurement, since rod
bearings
have no center oil channel.
It can be really tricky to keep the
ball from rolling away as you place it
between the bearing and the micrometer !!
. |
Why is it so important to measure (test) things for yourself ??
The (symbolic) power of prestige has a very powerful effect on preventing new
information from being known. (One famous tuner teaches the unquestioning next
person who
becomes the next famous tuner who teaches the unquestioning next person etc...)
This might not seem like a fair statement, since these easy break-in
articles appeared in the 1990's, and this bearing is from a 2000 model.
Believe it or not, the oval bearing solution was developed in the auto
racing scene
...
... during the 1950's !!
In this case, the conditions of the
experiment began to change way back when Elvis was the man on
the radio. 50 years later, many scientifically educated engineers,
mechanics and race tuners still haven't observed this change.
The most important concept of science isn't memorizing facts, it's
observation of phenomena.
Throughout history, most of the
really big innovations and inventions were made by people who rejected the idea that
people should be trained
to think a certain way.
In the 1950's, thousands of professionally trained automotive engineers
thought that engines couldn't be revved
any higher. Guess who found the solution ?? A "non-trained
engineer" who was able to think freely !! Had
everyone just "Stayed In The Box", the 15,000 RPM plain bearing production
engines that we now take for granted -- wouldn't be possible !!
By saying this, I don't mean to imply that formal engineering training is
unimportant -- it's very important. But, it's equally important to keep an
open mind, as that's the key to the development of innovative technology.
Now, 15,000 RPM might sound impressive, but for 2004, Suzuki's GSXR 600
revs to ....
16,200 RPM.
That's a production engine, and there's no doubt that racers will push
that limit even higher !! Of course, the bearing design isn't the reason
that the engine makes power at such high RPMs -- that has to do with the
tuning. There are also other factors that make this ultra high RPM
possible, (for example, the engine uses lightweight titanium
valves.)
But, the bearing design which was developed in the '50's allows
that to happen without engine failure. With "round" bearings, the
high revving fun would all end in an instant.
Think about it: Today's 16,200 RPM machines were made possible by a
"non-trained engineer" !!
Have you ever felt like you're "only
one" who thinks something ?? I know that feeling well, and I'm going
to tell you this:
Don't worry, you're absolutely on the right track !!
The bearing solution was found "back in the old days", but knowledge of this hasn't fully reached the
mainstream. As a result, the
seriously out-dated idea still
survives among many tuners and engineers that new bearings don't have
the right running tolerance, and need to be
gently worn in before they fit correctly.
By carefully observing an engine and asking the
right questions, we can discover for ourselves that this idea doesn't at
all match up with actual observation.
There has been a long unbroken chain
of memorized facts.
A chain of misinformation can easily survive if no one in the chain stops
to think and ask
questions.
.
|
Quote from the How Long Do You
Have To Baby It article:
"
... firm part-throttle operation for a period puts a
load on
bearings
and other parts, forcing their surfaces together so they can
polish each other to a fine fit. "
Quote from the Give It A Break article:
" ...a
constant load is not ideal for breaking in the bearing
tolerances."
Bearing Clearance Break-In ?
Limited observation can "prove" that the above bearing statements are "true"
!!
Why is that ??
For those who don't work on engines, it has to do with the perceived expert status of the people saying
it. This "expert phenomenon" also influences many professionals, but
another factor becomes involved for them. It has to do with what
I feel is the most common problem in science. The distinctly unscientific
method of
not taking an open minded,
objective, thorough and personal observation of the subject being studied. This
has to do with fear.
There are very few scientists who can be
objective when new ideas threaten their already preconceived ones. This has
nothing to do with how well they memorized scientific "facts" or the
amount of time spent in school. The most important skills of science aren't
currently being taught in school.
It's all about honesty and the courage to
have a favorite idea found to be wrong. Decide to be completely honest with yourself (objective), and you'll
have the potential to be a better observer of reality than many scientists.
Bearing Comparison
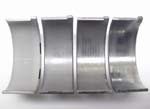
The rod bearings from left to right in the photo below are as follows:
1) Brand new, just unwrapped from the package.
2) Blasted at the factory, and run hard on the street for approximately 30
miles / 48 KM.
3) Raced for 1 season, constant high RPMs for about 2,000 miles / 3220 KM.
4) Raced for 2 seasons (inc. endurance races), constant high RPMs for
about 6,000 miles / 9660 KM.
Except for the brand new one, all of these bearings came from engines
which were broken in
according to the Break-In Secrets article.
.
|
.
A casual look shows that, as the mileage increases, bearing surfaces do appear to be
getting polished to a fine
fit, or having their tolerances broken-in.
This would immediately confirm
what the experts said.
End of story.
At this point, a
careless observer might say: "That's all I needed to see."
There's no question that the dull gray metal is starting to look
bright & shiny
!!
But, a simple test and observation reveals that:
It's only a coating that's slowly wearing off
during a certain condition
!!
The areas where the coating has worn off are
revealing the brighter colored
babbit layer metal underneath, which exactly mimics the metal polishing process
-- in appearance only !!
.. |
4 Yamaha R6
rod bearings
with progressively increased use:
#2: Even after the
MotoMan's "insane" break-in method, the coating has been
barely affected. (There are some small scratches on it, but that didn't
happen in the engine.)
#3: After a full
season of high RPM racing, most of the coating is still there.
#4: Even after 2 full seasons of racing, the most heavily used bearing
still has much of its coating !!
|
What's really
surprising ...
... is that experts in both articles thought that new engines are assembled with
bearing clearances
that are so tight, that the words "fit" or
"tolerance" are applicable.
What do you think would eventually happen if bearings,
(which possess the softest metal
in an engine), are run with less than the correct oil clearance ??
(Ka-Boom !!)
How much did the most heavily used bearing's
babbit layer actually wear
??
|
..
Here is the same heavily used bearing (#4) pictured above.
Its thickness is being
compared to a brand new bearing (just
unwrapped from the package) of the same size specification.
It turns out that even after
6,000 miles / 9660 KM of constant acceleration
and deceleration from 10,000 to 15,000 RPM, the
bearing's measured thickness is exactly the
same as the new one !!
(The thickness is the "fit" or "tolerance"
described in the easy break-in articles.)
Although these bearings came from a newer engine,
since I started building race engines in 1990, I've never seen
plain bearings with similar race mileage wear to the point
of a measurable difference from new.
(There is one exception, and it affects a main bearing of engines of a
certain design, as you'll see later on this page.)
As long as the engine is apart, it's a good idea to replace all of the
bearings, but it's
really not necessary from a
clearance standpoint.
.
|
Heavily Used Yamaha R6
Rod Bearing
|
|
.
Brand New Yamaha R6
Rod Bearing
|
And Now
...
It's Time For The "Paper
Towel" Experiment
!!
For less than $10, you can
learn more than many engine experts know about bearings ...
.
|
The shiny bearing in the photo on the right looks very "worn", but it's never been in an
engine ...
I just wiped it off with a wimpy piece of
Paper Towel !!
This coating isn't like most
coatings. It's incredibly easy to remove. I would describe it as
a powder.
Please don't take my word for
it, buy yourself a main or rod bearing from your favorite vehicle and try this experiment at home.
You won't believe how easily this coating can be removed until
you
experience it for yourself !!
.
|
.
" Presto "
Like magic, in less than 5 seconds, the bearing was "polished".
Here you can see that when the
very top "layer" that gives the "unpolished" look is
removed, the metal underneath makes the bearing
look "polished."
This "layer" is now just residue on
the paper towel.
. |
Note:
"destroying" the
coating doesn't damage the bearing !!
Many race engine builders wipe off the gray coating with some paper towel before installing them, without any problems whatsoever. (The coating isn't
able to protect the babbit layer.) If a wimpy piece of paper towel
can wear off the coating this
easily ...
Why doesn't the coating
immediately wear off, during the full throttle max RPM blast
at the factory ?? How can any of it possibly survive after all that racing
use ??
The answer to this will
be revealed in a moment. This will illustrate where the easy break-in concept
has been a total misinterpretation of the evidence. This in turn has resulted in the
widespread misunderstanding of the causes of bearing wear, and engine wear in
general.
How can we
determine the babbit layer thickness ??
Call Yamaha ??
Call a motorcycle shop ??
Watch the Discovery Channel for a really long time ??
Ask a Factory Race Team tuner ??
Read the easy break-in articles ??
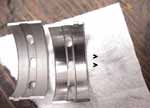
Experiment #2
Instead of asking someone who may not know the correct
answer ...
Here's How To Find Out For Yourself:
|
.
By using sandpaper, and sanding down just until a consistent copper color is seen, we can then
measure the difference to determine the babbit layer
thickness !!
Of course, destroying the babbit layer does
destroy the bearing.
(These bearings are both of the same thickness
specification.)
. |
The bearing on the
left is being sacrificed for the sake of science ... it's not
going to be used in an engine !!
|
|
First, measure the bearing with the babbit layer ...
|
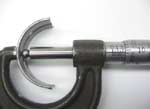
|
|
Next, measure the bearing with the babbit layer removed
...
... then, subtract the difference.
If you own a micrometer, try this
experiment yourself !!
Be sure to clean all the grit off the sanded bearing before measuring it.
Also, be sure to let it cool completely after it's been sanded, or
the
heat from sanding will affect the measurement.
|
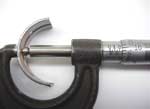
|
Yikes !!
There's only .0006 of an inch of babbit before copper is reached !!
(On some bearings, the babbit
layer thickness is even thinner -- .0005 in. / .0127 mm.)
Just How Thin Is .0006 inch / .015mm ??
|
.
For this demonstration, I chose a really thin thing
that everyone can relate to -- paper.
A standard sheet of paper is .004 inch / .1mm.
That means that it takes slightly more than
6 1/2 babbit layers to equal the thickness of 1 sheet of paper !!
.
|
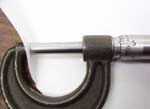
|
Words and numbers are cool, but it's
way cooler
to make a
mental picture !!
In this diagram, I've illustrated the exact relationship between the 2 sizes as
a
percentage represented by digital pixels:
.
.
Ladies and Gentlemen,
The super thin / ultra soft babbit layer can't withstand any
metal-to-metal contact while the engine is
running.
Remember what the experts said about
bearings being "broken-in" ??
Well here's the truth ...
If your "bearings are polishing to a fine
fit" while you're on the road ...
or
if you're "breaking in the bearing tolerances" while
you're on the road ...
or
if your "bearings are shedding layers to
become intimate with the crank journal"
while you're on the road ...
You'll soon be getting "intimate" with your dealership's parts department !!
Forget what the experts said.
You're becoming the real expert now :)
How Do Bearings Wear Then ??
The next series of photos are from a heavily used race engine. It was correctly assembled by
another engine builder, who didn't remove the coating before the bearings were installed.
While this engine design may not be exactly like the one in your vehicle, this
will demonstrate how plain bearings wear in any vehicle.
Knowing that the very top "layer" is really just an easily removable coating,
and while keeping in mind all of the qualities of plain bearings, we can use the
information to determine how and when bearings wear the way a good detective
does.
Unemotional, deductive (logical) reasoning !!
Let's see if a pattern
develops...
|
.
Clue #1
There are 10 main bearing 1/2 shells, and 8 rod bearing 1/2
shells for a total of 18 in most modern 4 cylinder engines. The first thing that becomes immediately
apparent in inspecting this engine, is that by far the most worn
bearing out of all 18, is the main bearing indicated by
the "X". This is the only bearing in this engine which
has worn into the babbit layer.
(Note: this bearing is located on the right side of the engine. The view of the engine
below is upside down from the way the engine sits
in the bike.)
This is because in a side mounted cam chain tensioner design, the cam
chain is exerting a force
which is lifting the crankshaft upwards on just 1 end of the crank.
..
|
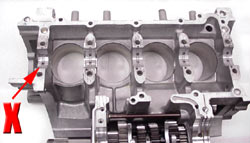
Note: this isn't a problem specific to this model, I've inspected 100's of side mounted cam
chain tensioned engines from different brands and models, and this same bearing
always gets worn far more
than any
of the others. |
.

Here's a close up of the bearing marked "X" in the
photo on the left.
If you take a close look at the large version, you'll see that it's
darker in the very middle of the worn area. It's actually starting
to wear into the copper layer.
This bearing definitely needs to be replaced !!
..
|
Why hasn't this engine failed ??
Because the wear is
only happening during a certain condition.
. |
Which force on the crank is greater: the
upward lifting effect
of the cam chain
from the tensioner and the valve springs ...
... or the downforce of the power stroke at 15,000 RPM ??
There's no comparison, the power downforce
is a much stronger force !!
Of course, during the power stroke, the force is spread across 5 lower bearings, but
realistically, if bearing wear were a matter of the amount of
throttle used (force) and RPM, then the bottom bearings would be wearing much
more than the one being damaged by the upward pull of the cam chain.
|
The Cam Chain Pull
VS
The 15,000 RPM Power Downforce:
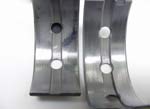
This photo shows an even better view of the cam chain tensioned main bearing's excessive wear (Left). It's
really worn !!
For comparison, one of the lower main bearings is on the right.
This bearing experiences the power downforce, yet it's not damaged at all
!!
When you use a wrench to turn an engine over with the
spark plugs removed, most of the resistance you're feeling is coming from
the
valve springs. It's very easy to do
on this engine.
You'll also notice that this resistance varies, (it feels
"lumpy") depending on where the engine is in its cycle as it's
being rotated. The cam chain gets tensioned the most at the peak
of this resistance.
Now imagine what the force would be like if you were able to hold onto a
wrench while this engine is running at 15,000 RPM.
That comparison puts the forces involved
into perspective !!
. |
How do springs pull up on the crank ??
I sized this photo so that the valve springs in this image are approximately "actual size":
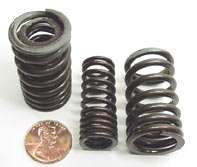
When the engine is stopped, often 1 set of valve springs are trying to
push the cam forward. This force pulls up on the cam chain, which in
turn
pulls up on the crank.
The amount of force they pull up with,
depends on the point
at which the engine stops.
The cam chain tensioner also contributes a much smaller amount of upward force on the
chain.
I didn't have an R6 cam chain tensioner spring, but this CBR600f3 spring
is about the same size, and it exerts approximately the same force as
the
R6 spring does.

This image is also approximately "actual size".
As you can see by the wire diameter, this isn't a very powerful spring.
.
|
" Hold On A Minute, MotoMan ...
I once read in a magazine article that the right side end main bearing wear is caused
from the motorcycle
being leaned over on its kickstand. The oil drains away from this end of the
crankshaft, and the bearing is damaged on start-up. What do you have to say about that ??
"
Yes, I've heard the same thing, and
most mechanics have automatically agreed with that idea.
The only problem is ... it's not a correct diagnosis of the problem.
Clue #2
|

Thorvald Sæby
Now, as you can see, Thorvald
is a man who likes to win.
So, how did he break the new engine in ??
Did he gurgle around at part throttle like most of the other racers who
were breaking-in their new race engines that day ??
No Way !!
The engine was warmed up, and moments after the picture on the right was taken, he was accelerating full
throttle, shifting at 14,500 RPM through all the gears at one of the
fastest tracks in the world ... Daytona !!
One of the most noticeable attributes of winners,
is that since they aren't influenced by "what everyone else
thinks", they don't follow the crowd.
.
|
The Race Stand:

Jørgen Johnsen of Oslo, Norway's Fast
Bikes gets ready to remove the race stand, while Team Yamaha Motor
Norway's Thorvald Sæby gets ready
to break-in the 2000 Mototune R6.
Although this is a different
racebike, the cam chain tensioned worn bearing shown in the
photos came from an engine which was always parked on a race stand.
With a race stand, the engine is always level when
the bike is parked. |
The "kickstand problem" is an an example of a mis-diagnosis of cause and effect.
Since the cam chain is on the right side of the
bike, this side gets
tipped up
when the bike's on its kickstand which is on the left side ...
... and so the kickstand explanation "seems logical".
By using scientific thinking and eliminating that variable,
one will discover that the same problem still exists.
Coincidentally, the discontinuation of centerstands coincided with the use of the end cam chain tensioner design.
Clue #3
Which force is greater, the weight of the crank, or the power downstroke at
15,000 RPM ??
There's no comparison, the power downforce
is a much stronger force.
|
Hint 1: Main bearings have the same
high RPM "oval"
non-contact protection design as rod bearings. The main bearings' housings
"oval" at high RPM also.
Hint 2: Gravity is pulling the crank down
when the engine isn't running.
Hint 3: Sometimes there is less upward pull on the cam chain, depending on
what part of the engine cycle the
engine is at when it stops.
|
Why are the lower main bearings' coatings only worn in the
center, not at the end section ??
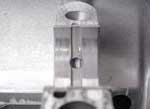
(That's curious.) |
Clue #4
|
.
There is no coating wear happening at the "oval"
high RPM pinch-in point
at the ends of
the
rod bearings either.
.
That's because all of the wear is happening...
...
during a certain condition !!
. |
|
It's True:
Plain bearings,
when correctly installed, and with proper oil clearance and pressure,
don't wear once
the engine is
running.
(While the engine is running, the bearings are floating on an non-compressible oil
film.)
The wear all occurs at the moment of start-up, after
the engine has sat,
and the residual oil has drained off.
This is the "certain condition" !!
It's not a matter of the amount of force, but rather when the
force is being applied:
|
.
When the engine is at rest, the unpressurized oil is often squeezed out by the upward pull of the cam chain.
Again, this depends on the point at
which
the engine stops.
When that happens, the cam chain end bearing looks like figure
"A".
When the engine is first started after it has sat for a while, there is a split second of rotation before the oil pressure
returns the journal to the normal relationship with the bearing shown in figure "B".
The cam chain tensioned bearing wears due to this momentary rotation when
there is a lack of oil between the 2 parts.
(Here again, the oil clearances have been greatly increased to illustrate
this concept.)
. |
Figure "A"
.

.
The camchain tensioned main bearing to journal relationship when the engine is turned off. |
Figure "B"
.
.
The camchain tensioned main bearing to journal relationship when the engine is
running.
|
Analysis
The main bearing wear occurs when either the
downward weight of the crank or
the upward pull of the cam chain has
squeezed out the residual oil while the engine is at rest.
Except for the cam chain tensioned one, none of the other upper main
bearings are wearing. This is because they don't have any "oil squeezing"
conditions while the engine is stopped, and they aren't subjected to any serious
force on start-up, only at high
RPM.
In
the case of the rod bearings, oil drain off is also responsible for the start up
wear. With the rods, there is another factor worth considering. Whenever the engine is stopped, the
residual oil drains off soonest from the rods that remain above the middle of
the stroke, and so more wear occurs on these rod bearings. I've seen an equal
amount of bearing coating wear on both sets of rods in
every 4 cylinder engine I've ever inspected. I suppose it's possible that one
set could always stop below the
middle of the stroke every time the engine is stopped ...
... and that would be like winning the lottery and getting struck by lightning
on the same day.
It's possible, but highly improbable.
Even at redline RPM, all of the bearings are protected by a full pressurized oil
film. The fact that
none of the 18 bearings' coatings are
worn into the "oval" section is more evidence of this.
Unbelievable
The experts in these articles have
confused start-up wear with "break-in wear".
If this page has caused you to start
wondering about the wisdom of automatically believing experts,
then you're on the "same page" as me. ;)
You
can't prevent start-up wear by breaking-in your engine "easy"
...
The only
way you can prevent it is to never start the engine.
That would kinda take all the fun
out of things.
You've probably heard that the majority of engine wear occurs as the engine is started.
(It's true.)
.
Take The Bearing Quiz !!
|
Removing the coating makes it difficult to see how much
a bearing has been used.
It's only wear to the babbit layer
that's a concern, because that will
cause problems. |
.
These 3 main bearings have had their coatings wiped off with
paper towel. This is an extra large photo, so you can see the surfaces
close-up.

1 was heavily used (roadraced), 1 came out of a brand
new bike which was only blasted at the factory, and 1 is brand new and was
never used in an engine.
Can you identify the bearings ??
The answer will be revealed in the next
issue.
. |
What happens if the bearings are tight ??
Will a hard break-in damage them ??
Absolutely ... Yes !!
But, it's important to understand that even during an easy break-in, tight or
incorrectly installed bearings will be equally damaged !! A really tight bearing
won't
last long enough to be "broken-in", and a bearing with minor tightness
will develop into a major problem eventually, regardless of how the engine is
run.
Here's why:
2,000 RPM ...
Even with light
throttle at a super-mellow 2,000 rpm, the tight section will cause permanent
damage to the ultra soft, ultra thin babbit layer from the
mere rotation
of the crank journal. The re-distributed metal can't escape,
so it spreads over the
bearing creating new tight areas. This smearing
metal process generates a lot of heat, and the heat expansion
and thermal distortion tightens the bearing clearance even more -- and eventually prevents the
formation of any oil film. The amount of time this takes depends on how tight the bearing is.
A tight bearing problem can only be solved by taking the engine apart to correct the
clearance.
Tight bearings are an
extremely rare occurrence with
production machines. I've
only seen one example of this during my entire career as an engine builder ...
|
.
Once upon a time in Norway, a tiny plastic bit almost
stopped ...
The Mighty
Budweiser Yamaha R1 !!
. |
|
Brand New 2002 R1 Engine
During assembly at the factory, a nearly invisible stray piece of plastic went unnoticed
as it sat on the
main bearing saddle and the bearing was
installed on top of it.
.
The seemingly insignificant naughty little bit lifted the bearing enough
that the crank wore through the
babbit layer and was starting to expose
the copper layer.
This isn't start-up wear, so there was friction being developed while the engine was running. This
causes thermal distortion (warpage) and eventually,
further damage.
But what about:
Oil, like all liquids, is non-compressible ??
The physics haven't changed, it's just that the "container" for
the oil is no longer complete, because part of its space is now being
taken up by
the raised section of the bearing.
.
|
.
This engine was starting to shed bearing layers to become intimate
with the crank journal
while it was running !!
Since this bike was just removed from its crate and hadn't even been
ridden yet, the damage
occurred at the factory during its initial run. I first got
suspicious of a problem when I smelled the faint odor of burnt oil as the
crankcases were opened.
Luckily, the soft metal bearing design concept worked, and
the crank was unharmed. Rather than replacing a $350 crank, I only
had to replace a $7 bearing !!
.
|
I'm going to pose a question here:
What might have happened if this engine had been purchased by a street
rider who
carefully followed the owner's manual during break-in ??
The answer will reveal one of the best
reasons
not
to do an easy break-in.
It also reveals one of the real
reasons why the factories recommend that you should run a new vehicle
gently.
I'll discuss this in the next issue.
|
Only A Matter Of Time:
Had this engine been raced without fixing this problem,
the extreme localized friction and the
thermal distortion that causes, could have eventually caused the babbit layer to
unravel.
The Mighty Budweiser Yamaha R1
would have been reduced to zero horsepower.
A terrible situation for the racer, engine
builder, tuners, fans, and sponsors !
The problem was fixed so that didn't happen, and once we got to the track in Sweden,
there was a very happy ending to this story ...
.
|
|
.

2001 Norwegian Champion
André Løwen
Knee on the floor in Sweden on the Budweiser Yamaha R1
After finishing the first qualifying session in 2nd position for the
May, 2002 Superbike race at Anderstorp, Sweden --
here's what
André had to say:
" MotoMan ... this is the best race bike I've ever ridden. "
High velocity intake ports, fixed main bearing
problem, hard break-in ...
... plus lots more "out of the box" tuning secrets yet to be revealed !!
.
|
 
Ice Cold
Bud !!
|
More and more people are discovering that a hard break-in really does result in a lot more power.
(But, there has still been a feeling that there must be a trade-off of damage &
lower long term reliability.)
Now, more and more people are discovering why a hard break-in doesn't do
any damage in a correctly set-up engine.
There is no trade-off.
What if it turns out that an easy break-in actually
causes long term engine damage
...
the very thing the easy
break-in article readers want to avoid ??
Stay Tuned !
It's hard to imagine
that truth can be so completely reversed.
The widespread presence of the "expert/prestige box"
makes truth reversal super
easy to do !!
|

|
.
5 New Techniques For
Thinking Outside of the Box:
1)
Use the next door neighbor reading technique
with everything you read -- you'll be surprised at what happens.
Your real-world intelligence will skyrocket.
2) Don't allow experts to think for you. Observe, test and measure things for yourself.
3) Make mental still pictures to visualize reality.
4) When you've mastered #3, practice making mental moving pictures.
5) Question everything, especially the most widely
assumed premises !!
That's the key to forming truly logical conclusions.
You've got the Power, my friends !!! |
|
3 Ways to Minimize Your Engine's
Wear !!
Tip #1:
What do most people do when they start an engine ??
Turn the throttle up !!
It seems logical to do this, but revving up an engine just as it starts is the worst thing
to do !! To minimize start-up wear, never
start an engine with more RPM than is
absolutely necessary.
Very Important Note: this is a completely
different concept from warming the engine up before running it hard. The
reasons why insufficient warm up causes damage will be covered in a future
issue. Here I'm only referring to the first moment of rotation, and 1 or 2
seconds after the engine is started.
Tip #2:
Even if you don't turn up the throttle on start-up,
the factory does it for you
...
Did you know that most motorcycles are designed in a
way which actually causes their engines to wear out faster ?? When the
"engineers who design the bikes"*
write the owner's manuals, besides teaching millions of people to break it
in easy, they also tell people to use the choke to start the engine.
* The
more you learn about engines, the more you'll realize that much of the "engine information" in the owner's manuals wasn't
written by the engineers and has absolutely nothing to do with good
engineering.
The "choke" on most bikes enrichens the fuel/air mixture, but it
also increases the engine speed on start-up. The fast idle choke causes the cold engine to rev up to 2,500 -
3,000rpms, which greatly increases start-up wear.
Because of this, using the "choke" causes almost all of
the engine wear the bike will ever
get !!
Much more than during any other running condition -- even when the engine is at
redline !!
If possible, don't use the choke at all. If your engine absolutely won't start
without it, use the least amount of choke so that the engine idles as low as
possible on start-up (ideally 1,000 - 1,250 rpm on most motorcycles).
Some might say, the manufacturers can't help this .... how are you supposed to start a bike, doesn't the mixture
have to be richened up when it's cold ?? My answer is: the enrichening effect of the "choke" isn't the problem,
the high idle effect is, and that's not at all necessary for
cold starting.
Since most consumers and magazine tech writers are unaware of this -- as far as the manufacturers are
concerned, there's no problem.
The $ bottom line is: the high idle
"choke" design creates an increase in the overall sales of parts,
bikes, and mechanical work for the dealerships.
I think this high idle
choke effect is still used on newer cars, but I'm not 100% sure.
Can any readers confirm ??
Tip #3:
The fact that bearings don't lose all of their gray coating to become instantly
shiny on start-up means that total no oil situations are rare, since
there is usually some residual oil.
However, if you have an vehicle that has sat for a very long time, this is
likely to cause more than the usual amount of start-up wear. I recommend turning it over
with a wrench to manually pump oil to the bearings before such an engine is started.
(This is why race vehicles often suffer more extreme start-up wear than
street vehicles do -- race vehicles often sit for longer periods between
start-ups !!)
Babbit
Layer Wear Does Eventually Take Place ... No Matter How The Engine Is
Broken In.
By using these 3 tips, it
will take a much longer time before start-up wear will add up to
the point of your vehicle requiring bearing replacement. Measurable wear does
eventually take place on the babbit layer after thousands of start-ups. At
the current level of engine technology, this continues to happen regardless of the engine's mileage.
Engineering
students ... can you think of any solutions ?? I'll be sharing some
of my ideas in the next issue !!
.
|
|
What Does The Paper
Towel Experiment Tell
Us ??
Think about the other materials in an engine. If someone
wanted to, they could apply paper towel friction to chrome, steel,
or aluminum for a very long time. After doing this, their hands would be
extremely sore, and they would discover that none of these materials
can be significantly worn by it.
By isolating and studying the one thing that can easily be worn off by
paper in less than 5 seconds, we can see that there is a phenomenon
taking place in engines which goes beyond our normal thinking about
engine wear. (Isolating is the key to setting up a good experiment.)
By fully studying the characteristics of bearing design, and
eliminating the variables as a good scientist does, it's easy to see
when the coating wear takes place, and that's also the way to
understand how most engine wear occurs. There are other reasons for
engine wear on other parts, and all of these topics will be covered
in future articles.
But, in the meantime I will say this: as long as the engine is
warmed up first, there is no damaging engine wear which happens as a
result of running it hard when it's new.
The second bearing in the photo in this photo shows that,
after a hard break-in on a new engine, the coating is barely affected.
The 2 race engine bearings shown in the photo are way past the 600-1,000
mile period that the
easy break-in enthusiasts might describe as the
"severe engine damage danger period", and most of their coating
is still there.
You can imagine that in an engine with just 600-1,000 miles, the
coating will still be in nearly brand new condition after any kind of
break-in.
. |
Paper Towel !!
.
.
.
The Second Bearing From The Left Provides The Proof.
A hard break-in doesn't damage
the bearings !!
|
Myths
Myths are born
when trusted experts use unscientific methods of study.
Myths get perpetuated when the public gives up their thinking power to
adopt a closed minded memorization of "what everyone else
thinks".
Whenever there's a
controversial subject, the reason for the controversy usually stems from
these 2 factors.
These are the 2
biggest problems in modern science ... and as you'll be discovering,
these problems affect almost all of the topics of engine tuning.
For this reason,
you'll find that most of the topics in upcoming issues of Power News will
be very controversial.
Plain bearings don't require break-in, but the power of the myth
has caused millions of people to think they do.
Teach
Others About Engines:
If you read the
motorsports internet discussion forums, you've probably noticed that the
subject of engine break-in often comes up, and the link to the Break-In
Secrets article usually gets posted. The range of opinions about it
are extreme. Some strongly agree, while most strongly disagree, but that
percentage is starting to turn around.
You can help "break the fake" about break-in !!
Please post the link to this article on your favorite forum.
Opinions
and Facts
The difference
between a fact and an opinion is very clear -- an opinion is only that,
until it is adequately proven. None of the characteristics of bearings are
presented
here as an opinion, they are all easily testable facts.
But here I will present my opinion:
In my opinion, the method described in Break-In Secrets
could have been safely used as long ago as ...
1969
(Maybe Even
Earlier)
(In no way
has this been proven here yet ... it's only my opinion. But I do have a
lot more evidence forthcoming.)
Plain Bearings Are Easily Damaged ...
... not from a hard break-in, but rather from incorrect installation, debris,
oil
dilution from fuel*, insufficient oil
clearance, oil contamination from blow-by acids*, oil starvation, damaged (rough) crank journal or bearing surfaces,
severely overheated oil and abnormal bearing or journal out-of-roundness which
causes
frictional wear on the high spots.
* Whoops -- I
just dropped 2 more hints as to why an easy break-in is really bad for
long term reliability.
Without any of those problems, plain bearings are very reliable !!
The key is simply to avoid all of those
problems.
In the next issue, I'm going to show my techniques for bearing
assembly,
as well as some common, avoidable reasons that bearings fail.
I'll also reveal some more of my power secrets which helped make this situation
happen:
|
.
Thorvald Sæby
(#44) and Tommy Hayden (#22) Daytona 2000.
In both '99 and '00, the Factory Yamaha R6 couldn't keep up with the
acceleration and top speed of the Yamaha Motor Norway, Mototune USA built Yamaha R6.
The Yamaha Factory Team threatened us with a teardown both years, as they were
100% sure that our engine was illegal for the supersport class !!
(Especially since Thorvald is much taller, and weighed
about 35 lbs. / 16 kg. more than Tommy. That's a huge aerodynamic
and weight disadvantage
on a small bike like a 600.)
.
|
Plus:
That "bottom line" is going to get even longer
... much longer !!
For example: 2 Quotes from the
How Long Do You Have To Baby It article:
Point #1 Run it too hard
= rings don't seal
" If you push too hard, too soon, the parts will score and scuff each other
because the heat generated will be enough to destroy the oil film locally.
A scuffed piston ring doesn't seal.
"
Point #2 Run it too
easy = rings don't seal
" ... break-in will
fail-- usually as a result of such light-duty operation that parts are not
loaded together forcefully enough to bed-in to one another. Rings glaze
and fail to seal. "
(These 2 points contradict
each other. Also, quote # 1 contains a cause and effect error, and if you think really deep, you'll notice that there's
a contradiction within the larger contradiction.
Hint: it's contained
in quote #2.)
The confusion in these statements has in turn led to a tremendous amount of confusion
among the general public about the process of ring sealing.
I've noticed that there's
even more confusion about ring sealing than there is about bearings.
There are many more
problems with these easy break-in articles that I haven't mentioned yet.
These will all be covered in future issues along with the ring sealing answers.
In the meantime, use the
Next Door Neighbor Reading Technique to see how many problems you can notice !!
.
What kind of epoxy are you using for porting ??
I'm happy that there are so many Power News readers are from every part
of the world !!
... except Antarctica.
I'd like to ask for your help:
Many people have mentioned
that the type of epoxy I recommended (JB Weld),
isn't available in their country.
There must be other brands of epoxies that will work for High
Velocity Porting.
I want to compile a list of epoxies which pass the long term
reliability test. Please e-mail me with the other brands of epoxies you've used, and if
possible, a report as to the long term reliability of it.
 I traveled to the Netherlands to work with a Kawasaki
Supersport race team with their ZX6R cylinder head development. In an upcoming
issue of Power News, I'll be featuring this team, plus much more about the
High Velocity
intake and exhaust
porting concepts, as well as new information that I've gathered since I
first wrote the original porting articles. I traveled to the Netherlands to work with a Kawasaki
Supersport race team with their ZX6R cylinder head development. In an upcoming
issue of Power News, I'll be featuring this team, plus much more about the
High Velocity
intake and exhaust
porting concepts, as well as new information that I've gathered since I
first wrote the original porting articles.
Also, I'm compiling a list of reader success stories about the High
Velocity Porting techniques featured here. If you haven't done so already,
please send in the results of
your efforts !!
" Have a Great Day !! "
... and thanks for all your help !!
Sincerely,
Pat McGivern
~MotoMan
|
|
|
MotoMan
|
 MotoMan's MotoMan's
.
Superbike, Auto &
Snowmobile
Performance
Engine
Info !!
|
Learn How to Do it Yourself:
High Velocity
Intake Porting !!
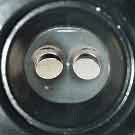
Smaller Intake Ports Gain 7 % More Power
|
|